
Setting BB Learn Adaptive Release
Tagged with:
blackboard
bblearn
Adaptive Release is overkill if your only criteria is date/time: Adaptive Release isn't recommend usually if you are only hiding or showing content based on simple data and time criteria.
If you need additional options for whether a folder, tool, or piece of content is visible to students, you may want to try the "Adaptive Release" functionality of Bb Learn.
You can access "Adaptive Release" or "Adaptive Release: Advanced" functionality for a folder, tool, or piece of content by doing the following:
- Hover over the folder, tool, or content in a content area with your mouse cursor.
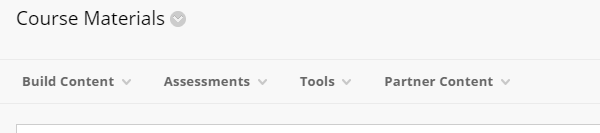
- A content area in a Bb Learn course section is a webpage that has the "Build Content," "Assessments," "Tools," and "Partner Content" drop-down menus at the top. The name of your content area will likely be different than "Course Materials."
The link in the left-hand navigation panel leading to a Content Area can also be called a Content Area.
Again, your content area will likely have a different name than "Course Materials."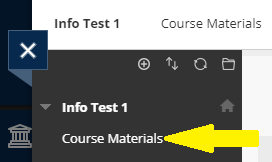
In a Content Area, you add, well, content. Like Items or Content Folders (from under "Build Content") to add text, web links, images, files, and folders. Assignment and test submission links appear in Content Areas as well.
- A content area in a Bb Learn course section is a webpage that has the "Build Content," "Assessments," "Tools," and "Partner Content" drop-down menus at the top. The name of your content area will likely be different than "Course Materials."
- Click the circled down arrow that appears next to the title of the folder, tool, or content.
- Select "Adaptive Release" or "Adaptive Release: Advanced."
- You may want to see if "Adaptive Release" will work for your purposes before using "Adaptive Release: Advanced."
- If using "Adaptive Release":
- Complete the relevant sections, such as the ones for date and/or membership.
- Membership is for specifying which student users or groups can see the folder, tool, or content.
- Click "Submit" when finished.
- Complete the relevant sections, such as the ones for date and/or membership.
- If using "Adaptive Release: Advanced":
- Click "Create Rule."
- Enter a name for the rule, and click "Submit."
- Click "Create Criteria."
- Select date, grade, or membership for the type of criteria.
- Membership is for specifying which student users or groups can see the folder, tool, or content.
- Provide the criteria.
- Click "Submit."
- Click "Review Status" if you want students to have to mark some other folder, tool, or content as reviewed before seeing this folder, tool, or content.
- Select the folder, tool, or content that the student has to review.
- Click "OK" if prompted to turn on "Review" for the selected item.
- Click "Submit."
- Repeat steps c-h above for step 6 for additional criteria.
- Click "OK" in the bottom right when finished setting criteria for a rule.
- Repeat steps c-j above for step 6 for additional rules.
- Click "OK" in the bottom right when finished.
If a folder, tool, or piece of content in a content area is using Adaptive Release, you will see "Enabled: Adaptive Release" under the title of the folder, tool, or piece of content.