
VoiceThread Basics
Introduction
A VoiceThread is an online slideshow presentation where you can easily insert video/audio/pictures/text into each slide.
Videos are especially easy to add.And other students and the instructor can add video/audio/pictorial/text comments to each slide in the presentation.
You can't screen record with VoiceThread, but you can upload screen recordings made with other programs/applications so students can access and comment on them.
The video about creating a VoiceThread at the top of the page found at the link below does a good job of showing what a VoiceThread is.
Creating a VoiceThread in Bb Learn takes some additional steps, which are described in sections below.
These Instructions May Be A Little Out of Date.
These instuctions may be a little out of date.
Create a VoiceThread Link
- Navigate to a "Content Area" in your Bb Learn course shell.
- Click “Build Content.”
To see what a "Content Area" is, see Bb Learn Content Area -- Creation. - Click “VoiceThread Presentation.”
- Enter a "Name" and optional "Description."
- Add attachments in the "ATTACHMENTS" area.
(a) (Optional) Choose "Color of Name." - (Optional) To grade the VoiceThread:
Choose whether you will "Permit Users to View this Content." (Users = students.)
Select "Yes" next to "Enable Evaluation."
Enter the "Points Possible."
Choose if the grade will be "Visible to Students."
(Optional) Set a "Due Date." - Choose whether you will "Track Number of Views."
- (Optional) "Select Date and Time Restrictions."
Be sure to select "Yes" for "Permit Users to View This Content" if you have date/time restrictions. - Click "Submit."
Your VoiceThread link is created, but it has to be configured. - Click the new VoiceThread link to set it up.
- Then choose a type of VoiceThread to set-up.
Course View
See "Create a VoiceThread Link" section above to create a CourseView VT link.
Course View shows all VoiceThreads that have been shared in the Bb Learn course shell.
Use this option if you want students to find and comment on each others' VoiceThreads.
You and students can refer to the following video to create new VoiceThread presentations.
Individual VoiceThreads
See "Create a VoiceThread Link" section above to create an Individual VT link.
After creating your VoiceThread link, click the new VoiceThread link to get it set up.
Then choose a type of VoiceThread to set-up.
An Individual VoiceThread link displays one VoiceThread presentation when students click the link.
Use this option to provide direct access to specific VoiceThread of yours.
You can then refer to the following video to create new VoiceThread presentations.
Creating a New VoiceThread on an Individual VoiceThread
Select from an existing VoiceThread or create a new VoiceThread.
To create a new VoiceThread, click "Create a new VoiceThread."
The video on the page below will provide further instructions. (You will not see the "Create" icon shown in the video).
PLEASE NOTE!
***Please note: making a VoiceThread editable to students gives students the ability to delete the VoiceThread.
It is not recommended to enable this for students.
If students delete the VoiceThread, it is irretrievable.***
VT Home
See "Create a VoiceThread Link" section above to create a VT Home link.
With a VoiceThread (VT) Home link, each student and instructor will see all of their own VoiceThread content, including content from other courses.
To create a new VoiceThread, click "Create a new VoiceThread."
The video on the webpage below will provide further instructions.
- https://voicethread.com/howto/creating-a-new-voicethread-2/
- Note: You will not see the "Create" icon shown in the video
Sharing a New VoiceThread from VT Home
If you or your students create a VoiceThread on the VT Home page, that VoiceThread has to be shared with the class group.
Otherwise, no other student or instructor will see it.The webpage below tells you how:
PLEASE NOTE!
Do NOT make your VoiceThread editable to students.
Otherwise, students can delete the VoiceThread.
If a VoiceThread is deleted, it is irretrievable.
Retain Access to VoiceThread After Its Disabled
Also, if a student shares with just the class, and VoiceThread is disabled in the Bb Learn course shell, the instructor will lose access to the VoiceThread.
So you may want to ask the student to take the following steps as well to make sure you (the instructor) will still have access.
- Follow the steps you would normally take to share a VoiceThread you own or have sharing privileges for.
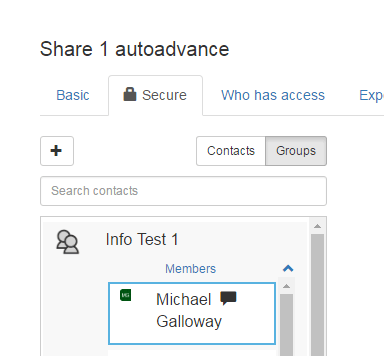
- In the "Share" pop-up window, click the "Secure" tab.
(a) Then click the name of the instructor.
The instructor in this example is "Michael Galloway," and the class is "Info Test 1."
But the instructor and class will be different for you.
- Make sure "View" is green.
(a) If not, click it. - To allow the instructor to comment and/or edit, click "Comment" and/or "Edit."
- Uncheck "Notify by email" if you don't want the instructor to be notified about access by email.
- Click "Share."
- If you see a "Success!" message, then the VoiceThread was shared with your instructor.
- Close all windows.
- You're done!
Assignment Builder
Commenting
Video example of an audio comment at top of page, and text instruction for leaving a video or other comment is lower down the page.
- https://voicethread.com/howto/how-to-comment/
- Feel free to share the above link with your students.
Here is how to Comment Across Multiple Slides:
Editing
You'll need to click a link to the VoiceThread, or click a link to the VoiceThread course webpage, and then find the VoiceThread.
Click a link to the VoiceThread home page and find the VoiceThread.
Then see the following webpage.
- https://voicethread.com/howto/category/editing-web-application/
- Some VoiceThreads, like Assignment Builders, cannot be edited.
Deleting
- Find the link to the VoiceThread assignment that you want to delete in a "Content Area.
- Write down the name of the VoiceThread link so you can find the corresponding column later in Grade Center.
- Hover over the VoiceThread link with your mouse, and click the circled down arrow that appears next to the link.
- Click "Delete."
- Click "OK."
- Click to expand "Grade Center" under the "Control Panel" in the left-hand menu.
- Click "Full Grade Center."
- Find the column with the same title as the corresponding VoiceThread link you just deleted.
- Click the circled down arrow in that column's header.
- Click "Delete Column."
- Click "OK."
- Be sure to check the settings on any calculated columns (Total, Weighted Total) that include other specific columns in their calculations.
Assignments
Notes