
Bb Learn Tests -- Timed Assignments or File Response Tests, Exams, or Quizzes
Overview -- Read This First
Bb Learn assignments do not have a timer, unfortunately. But Bb Learn tests do.
So simply add 1 “File Response” question to a Bb Learn test.
- It's now a timed Bb Learn assignment.
- *OR* a timed Bb Learn test where a student downloads a PDF or other file or document
& has to upload it before the timer runs out.
With a “File Response” type question, students upload a Word doc or other file & then submit the assignment/test.
You just set/enable the timer and auto-submit features on the "Edit the Test Options" page, though.
- Once a student starts the test, the student must finish the test within the time limit.
- The student can leave the test, but the timer continues to count down once the test has been started.
- The student can return to the test in Bb Learn as long as as the timer has not reached zero or 0.
- When the timer reaches 0 or zero, the test submits itself if the student hasn’t submitted the test already, even if the student does not have this Bb Learn test/assignment open in their web browser.
Like with a normal Bb Learn assignment or test, you can also set when the link to the Bb Learn test is available to students.
Creating this Assignment or Test
Create a Bb Learn test with a single "File Response" question, set the test's timer feature, and enable the test's auto-submit feature.
Here are step-by-step instructions.
- Go to a "Week" content area or other content area in your Bb Learn course section where you want this test or assignment.
Perhaps one for "Exams" or "Assignments."
Any area will do that has "Build Content," "Assessments," "Tools," and "Partner Content" drop-down menus under the page title.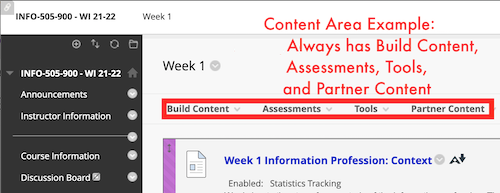
or...here's another example...
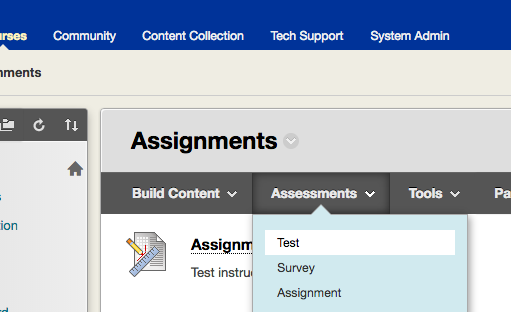
- Click "Assessments" > "Test."
- Click "Create" next to "Create a New Test."

- Enter the "Name" of the assignment or test.
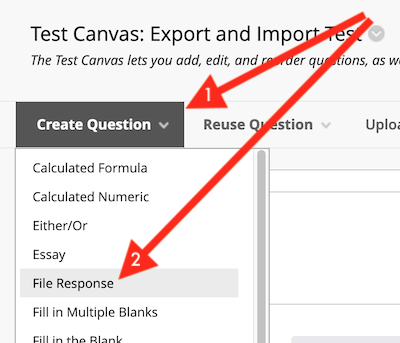
Then click "Submit." - Click "Create Question" > "File Response."
- Enter a "Question Title" and "Question Text".
You can just use the same text in each area for now. - In the "Question Text" box,
click the ... icon so all 3 rows of toolbars appear.
Then click the icon (circled plus sign).
 - Follow on-screen instructions to upload the file.
This is the file students should download during the assignment or exam. - Click "Submit."
- Scroll to end of questions & click "OK."
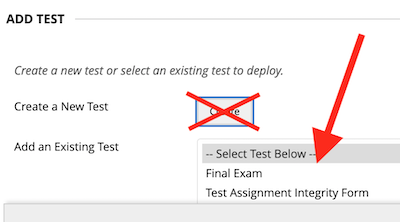
- Select the test you just created in the "Add an Existing Test" box.
- Click "Submit."
- Under "Test Availability,"
select "Yes" to "Make available to students."
(You'll set when it becomes available soon.) - Do NOT EVER check "Force Completion." NEVER!
If students have any power loss, internet loss, fluke, accidental page reload, they have to start over,
and you'll have to help.
The other settings do everything "Force Completion" does, and more, without the likely tech issues. - Check box next to "Set Timer,"
and set "Minutes" to desired length of test or assignment. - Select "ON" in "Auto-Submit" area.
- Check and set "Display After" and "Display Until" areas.
This sets when and how long the test or assignment is available. - Check box next to "Due Date" & set due date and time.
- Check "Do not allow students to start the Test if the due date has passed."
- Use other settings if you wish.
- Click "Submit" at bottom of page.
More Help with Bb Learn Tests
- A video & written step-by-step general directions on creating & editing Bb Learn tests is at:
Video -- Test Creation and Editing - Students need to submit multiple files?
Have them zip or compress the files together,
then submit the zipped or compressed file.
Grading and Sending Files Back to Students
If you want to grade the Bb Learn test as you would normally, that is fine.
Otherwise, the method described at the webpage below for sending files back to students through "Full Grade Center" for Bb Learn assignments will also work for the above Bb Learn tests.
OPTIONAL -- Downloading All Student Submissions
Bb Learn tests do not offer built-in functionality for downloading all student submissions for "File Response" questions.
Both the Firefox and Chrome internet browsers have an add-on that will let you download all student submission simultaneously.
Firefox is recommended over Chrome for this, but either will work. Chrome's is more complicated, though.
Here is how to download all student submissions for a Bb Learn test as described above:
- Install the add-on or extension, and then completely close and re-open internet browser.
(a) Firefox -- DownThemAll!
i. Install from https://addons.mozilla.org/en-US/firefox/addon/downthemall/
ii. Completely close and re-open internet browser.
iii. Skip to step 2 below.
(b) Chrome -- Chrono Download Manager (some additional configuration is required)
i. Install from: https://chrome.google.com/webstore/detail/chrono-download-manager/mciiogijehkdemklbdcbfkefimifhecn
ii. Enter chrome://settings/ in address bar.
iii. Scroll to bottom of webpage. Click "Show advanced settings."
iv. Scroll down more.
Under "Downloads," uncheck "Ask where to save each file before downloading."
v. Click "Extensions" in upper left.
Or enter chrome://extensions/ in address bar.
vi. Click "Options" under "Chrono Download Manager."
vii. Click "Interface" in upper left.
viii. Under "Notifications," uncheck "Show notification when download completes."
ix. Completely close and re-open internet browser.
x. Move on to step 2 below. - Login to Bb Learn. Enter your Bb Learn course shell
Enter "Full Grade Center."
(a) Click to expand "Grade Center" in left-hand course menu under "Control Panel."
(b) Click "Full Grade Center."- Click circled down arrow in test's column header.
- Click "Grade Questions."
- Click the number under the "Responses" column for the question to grade.
- Use the add-on or extension to download all the files on the page:
(a) Firefox
i. Click "Tools" menu (top of display) > DownThemAll! Tools > DownThemAll!
ii. In "DownThemAll!" pop-up window:
Click to expand "Filters."
Check "Archives" and "Documents," and uncheck anything else
(unless you are looking for other file types).
iii. Check "Save files in" box.
If not where downloaded files should go, click folder icon next to box, and set new location.
iv. Click "Start!"
v. Downloads complete? Close "DownThemAll!" window.
vi. Download files are in downloaded file location set above.
(b) Chrome
i. Click "Chrono Download Manager" icon in upper right of Chrome window.
ii. Empty pop-up window?
Click the "Chrono Download Manager" icon again.
Repeat until window has content.
iii. Click magnifying glass.
iv. Click Document" tab.
v. Under the table, check the file types to download (.docx or .doc are Word files, for example).
vi. Click the "Archive" tab.
vii. Under the table, check the file types to download (.zip are zipped or compressed files, for example).
viii. Click "Start All!" Return to "Full Grade Center" to start grading.
(a) Click to expand "Grade Center" in left-hand course menu under "Control Panel."
(b) Click "Full Grade Center."