Virtual Computing Lab (VCL)

Tagged with: VCL Virtual Computing lab

VCL is CCI's Virtual Computing Lab

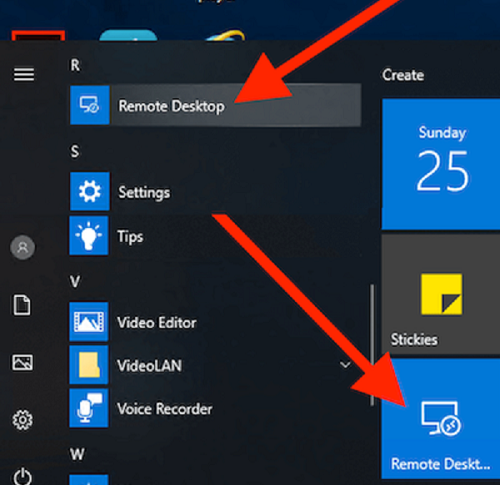
Creating a reservation in VCL

  1. First, be sure that the AnyConnect VPN application is installed on your computer, and open, and connected to vpn.drexel.edu 

    If you use the Authenticator app for MFA, and approve notices on your phone, the AnyConnect app will NOT tell you that an approval notification needs to be approved on your phone first when you try to connect. But you need to tap approve on that notice first. So unlock your phone, look for notices, and even open the Authenticator app and check/refresh it for notices. If you use text messages or codes, you'll be prompted by the AnyConnect app for those.

    Then proceed with next steps.
  2. Go to https://vcl.cci.drexel.edu & click "CLICK HERE TO CONTINUE TO VCL".
  3. Click "Proceed to Login."
    (If you do not see "Proceed to Login" button, try skipping to step 5 and click "Reservations.")
  4. Enter DrexelOne or Drexel Connect userid and password.
  5. Click "Reservations."
  6. If prompted, click "Allow" to allow notifications.
  7. Click "New Reservation."
  8. In the "New Reservation" window:
          Choose VM, such as Ubuntu Desktop or Windows 7.
          Choose when you want to use the VM environment.
          If you choose "Now" you will have to wait one minute.
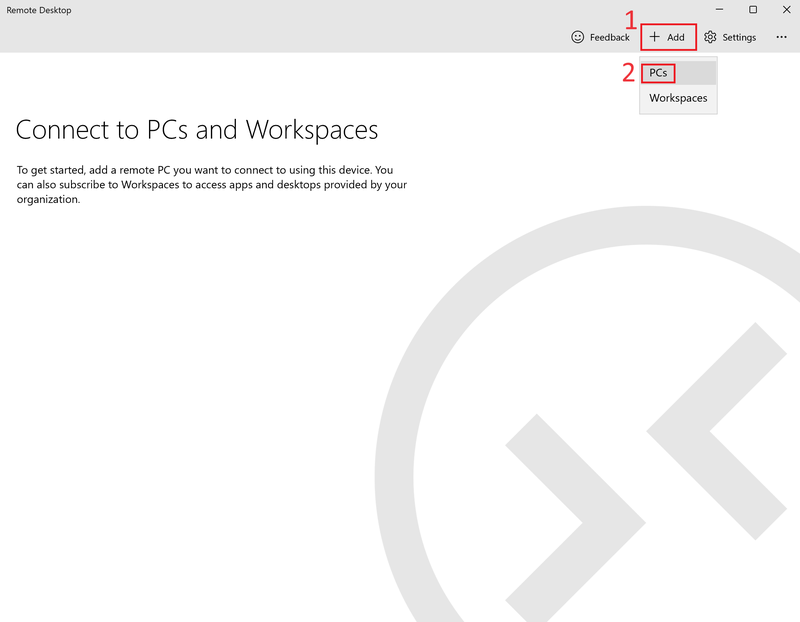
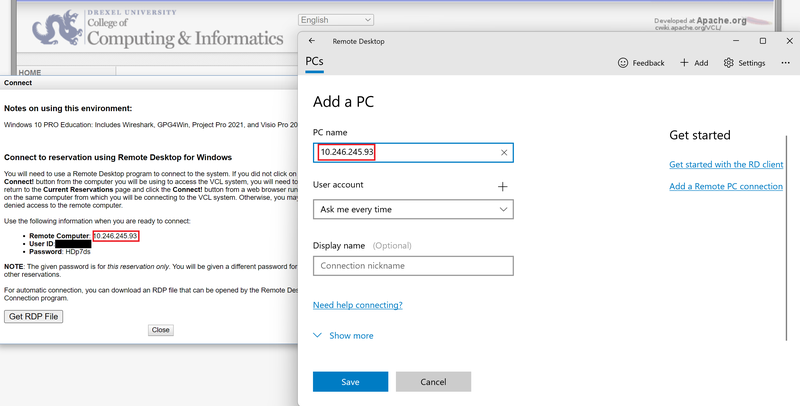
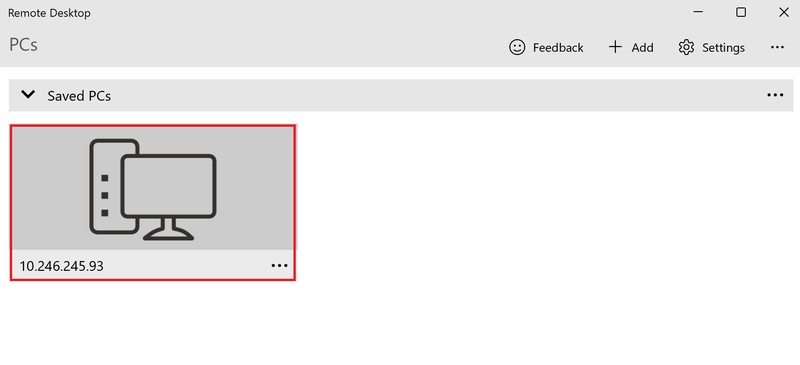
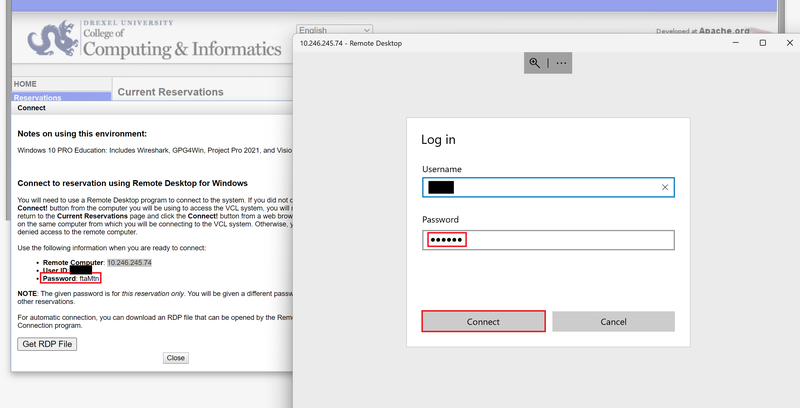
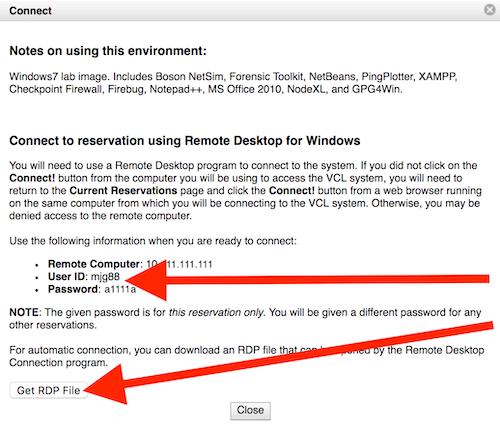
          Click "Create Reservation"
  9. When your VM is ready, click "Connect"
          You will also receive an email notifying you that your VM is ready

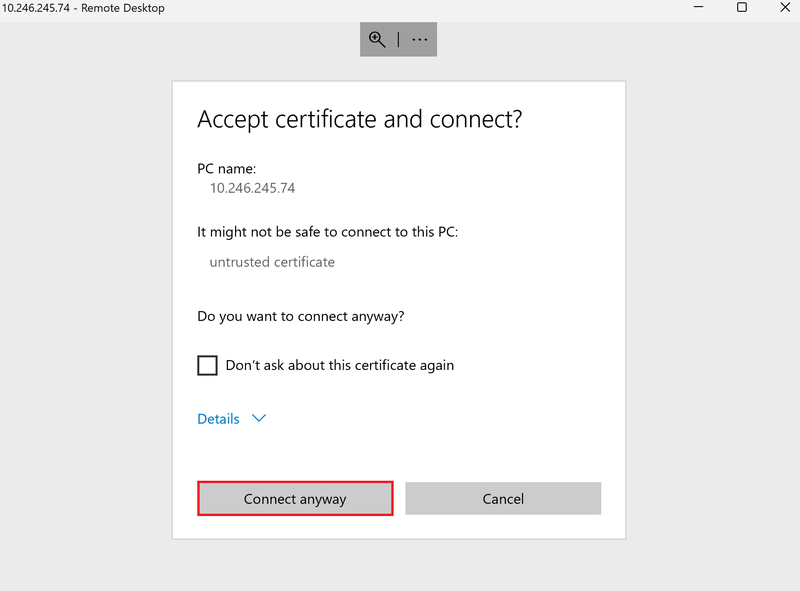
Before you can connect to your VCL VM you must be connected to Drexel VPN. 
Click here for instructions on how to connect to Drexel VPN.

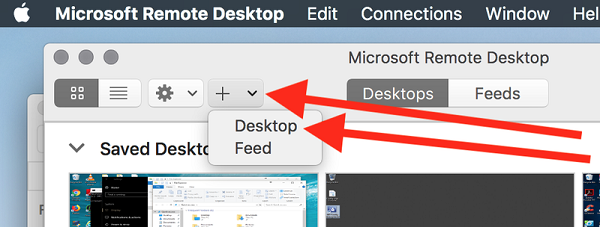
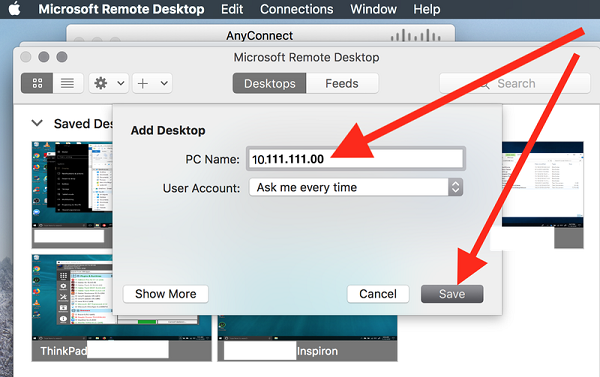
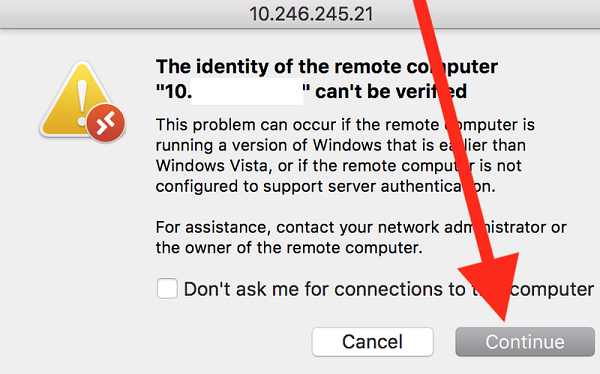
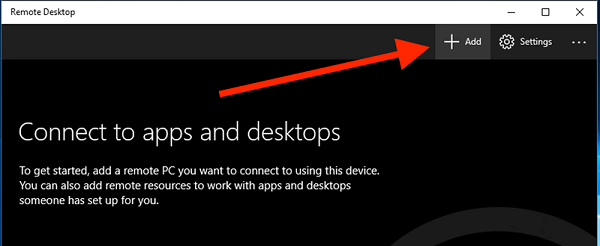
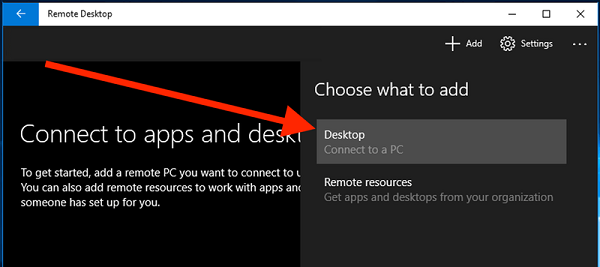
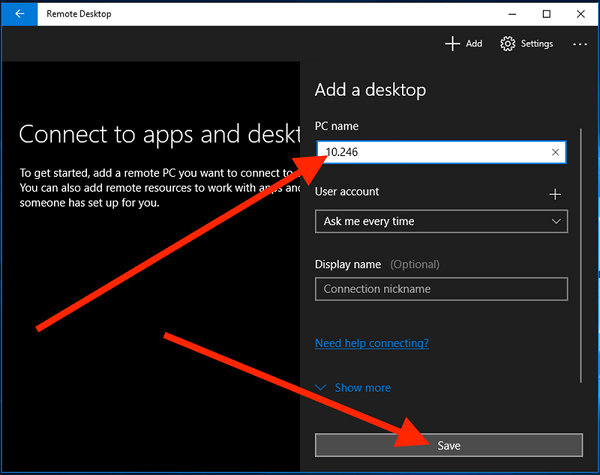
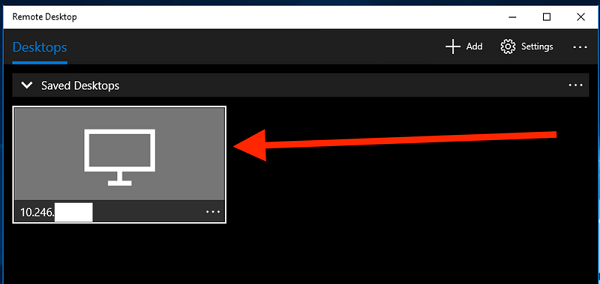
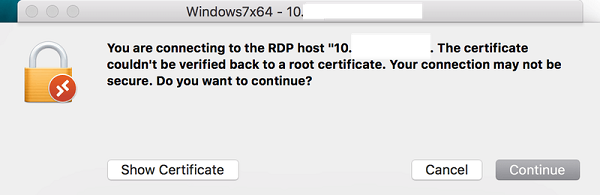
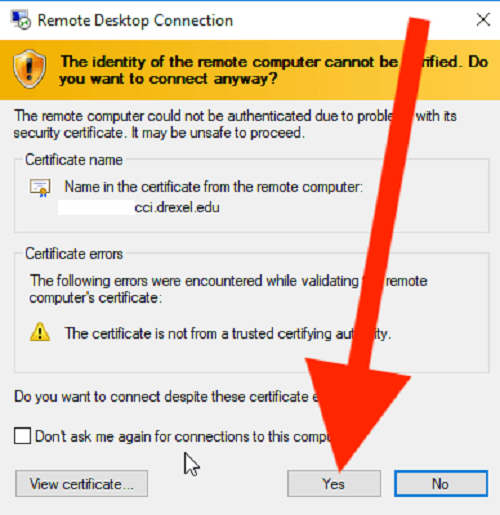
Follow the instructions below for your operating system to connect once your VM is ready.
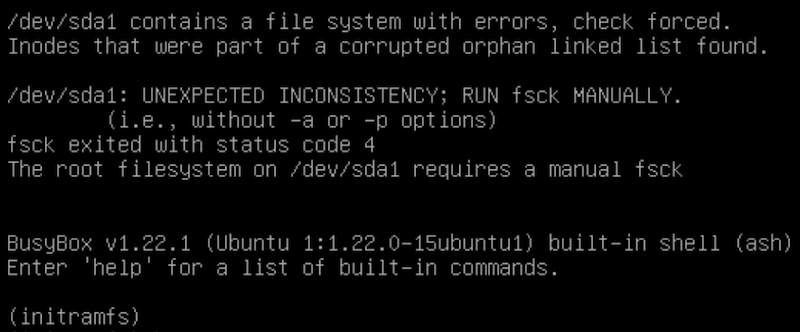
DO NOT DOUBLE-CLICK THE RDP FILE WITH LINUX VM's!!!

  • You will not be able to connect to your VM like this.
  • You will only see unlabeled buttons, no text, and will not be able to connect.

Also, you have a CHOICE between Ubuntu 12.04 & 18.04.

  • 12.04 is quite old. The Firefox web browser is version 52 or like. Firefox just hit version 100 in May 2022.
  • Use 18.04 unless the assignment specifically requires you to do otherwise.
  • Bb Learn does not work with the Firefox web browser in 12.04.

Instructions

  1. Download and install Microsoft Remote Desktop version 10 or above here 
    https://apps.apple.com/us/app/microsoft-remote-desktop-10/id1295203466?mt=12
  2. Once Microsoft Remote Desktop is installed open Applications > Microsoft Remote Desktop.
  3. Click the "+" icon and click "Desktop"
    Virtual Computing Lab or VCL image 1.png
  4. Enter "Remote Computer" IP address in the PC Name field & click "Save."
    VCL - Enter IP address of host PC name.png
  5. Now double check on the VM you just added and login with the User ID and Password from the VCL "Connect" window.
    If you are prompted with a warning like the one below, click "Continue".
    RDP Security Warning


DO NOT DOUBLE-CLICK THE RDP FILE WITH LINUX VM's!!!

  • You will not be able to connect to your VM like this.
  • You will only see unlabeled buttons, no text, and will not be able to connect.

Also, you have a CHOICE between Ubuntu 12.04 & 18.04.

  • 12.04 is quite old. The Firefox web browser is version 52 or like. Firefox just hit version 100 in May 2022.
  • Use 18.04 unless the assignment specifically requires you to do otherwise.
  • Bb Learn does not work with the Firefox web browser in 12.04.

Instructions

  1. Download and install Microsoft Remote Desktop version 10 or above here
    https://www.microsoft.com/en-us/p/microsoft-remote-desktop/9wzdncrfj3ps?activetab=pivot:overviewtab
  2. Open the "Remote Desktop" application on your windows computer.
    1sm.png
  3. Click the "Add" button.
    2.png
  4. Click "Desktop" under "Add."
    3.png
  5. Enter IP address in the "PC name" text box, and click "Save".
    This is the number that is next to the "Remote Computer" lines when you reserved in VCL.
    4.png
  6. Double-click the newly created saved desktop machine.
    5.png
  7. Login with the User ID and Password from the VCL "Connect" window.
  8. If prompted, click "Continue"
  1. Download and install Microsoft Remote Desktop version 10 or above here
    https://apps.apple.com/us/app/microsoft-remote-desktop-10/id1295203466?mt=12
  2. In the "Connect" pop-up window, note that the Userid and )in particular) Password. 
    This password is not the same as your DrexelOne or Drexel Connect Password
  3. In the "Connect" pop-up window, click the "Get the RDP File" button
    1.png
  4. Save ".rdp" or "RDP Connection File" to where you wish on your Mac or Windows computer.
  5. Double-click the "Windows7x64.rdp" file.
  6. If the .rdp file does work skip to step 7. 
    If the .rdp file doesn't work, or you need an alternative method,
    try the following:
          Open Applications > Microsoft Remote Desktop.
          Click the + or plus icon, and click "Desktop".
          Enter "Remote Computer" IP address in the PC Name field, and click "Save."
          Double-click the VM you just added in the Microsoft Remote Desktop application windows.
          Login with the User ID and Password from the VCL "Connect" window.
          If prompted, click "Continue"
  7. Click "Continue" when the security certificate is not verified alert is shown.
    4.png
  8. Enter your user id and password from https://vclweb.cci.drexel.edu or https://vcl.cci.drexel.edu
  9. And click "Done."


  1. In the "Connect" pop-up window, not the Userid and Password. 
    This password is not the same as your DrexelOne or Drexel Connect Password.
  2. In the "Connect" pop-up window, click the "Get the RDP File" button.
    1.png
  3. Save the RDP Connection file to your computer.
  4. Locate and double-click the "Windows7x64.rdp" file.
  5. If you are prompted, open the .rdp file with the "Remote Desktop Connection" app, which is built into Windows by default.
  6. If prompted, click "Connect", even though the publisher of this remote computer cannot be verified.
    winrdp.png
  7. When prompted enter your user id and password from the https://vclweb.cci.drexel.edu or https://vcl.cci.drexel.edu website.

This is only for use with Ubuntu Linux.
And this is only for command line prompt access via a terminal window,
rather than use of an actual Virtual Machine (VM).

  1. Use the IP address from the "Remote Computer" and login credentials in an SSH Client,
    like Putty (Windows) or the Terminal application.
    1.png

On a Mac

  1. Go to Applications > Utilities > Terminal.
  2. Type in "ssh xxx.xxx.xxx.xxx" without quotes.
    The x's represent your IP address.
  3. Hit enter and when prompted login with the User Id and Password from the VCL "Connect" window.

On Windows

  1. Download & install Putty. 
    Go here if you need help installing Putty
  2. Use the "Remote Computer" IP address as the "Host" address in the PuTTY client.
  3. Login with the User ID and Password from the VCL "Connect" window.


TL;DR How does this work? 


This method gives you access a VM or Virtual Machine or emulated version of Windows 10, which already has full versions of Microsoft Visio and Microsoft Project installed. 

  1. If off-campus or NOT on dragonfly3, you must be connected to the Cisco AnyConnect VPN application, installed on your computer, and connected to vpn.drexel.edu. Look on your phone (unlock and open for notifications, even if login failed appears) to approve MFA. Do not merely use the webpage at https://vpn.drexel.edu .
  2. Install Microsoft Remote Desktop (RDP) from the Apple App Store. Open it up.
  3. Go to https://vcl.cci.drexel.edu & login with your Drexel userid & password.
  4. Click "Reservations" & make a new reservation.
  5. Choose Windows 10 (not Ubuntu nor Windows 7 nor 8.1).
  6. Change time limit for the reservation from 1 hour to 4 hours.
    Yes, there's a time limit.
    You can keep manually extending it, but you have to manually extend it.
  7. Click "Connect" when the reservation is ready (takes 1 minute).
  8. Download and double-click the rdp file. 
    That should open it with Microsoft Remote Desktop (RDP) automatically.
    Or click the + sign in Microsoft RDP, click Add PC, copy in the IP address from the reservation pop-up window, and use the userid and password from the pop-up window create the remote PC, then double-click it in RDP.
  9. You'll see Windows 10 start up. You can sign in to Project and Visio if you wish.
  10. SEE THE IMPORTANT WARNINGS BELOW on how to save AND keep your files and your work.

IMPORTANT WARNING:

>>>You MUST copy/paste your Project or Visio files BOTH manually & frequently to a place of your choice on your Mac.<<<


The VM will disappear forever -- with any files--  on it the end of a set time limit. 


>>>If you don't manually copy/paste these files from the Windows 10 VM to your Mac, you will lose those files forever!!!!<<<


>>>Also, we HIGHLY recommend making a couple copies of your files on your Mac itself, in case you copy/paste and overwrite by accident to your Mac.<<<


You must copy/paste from your Mac to the Windows 10 VM when you create and connect to a new reservation in VCL.


NOTE for Visio Users

You can also use the light version of Visio in any web browser, and not the VM, by going to https://microsoft365.com and clicking the 9-dot square matrix icon in the upper left, and looking at all your applications. As long as there's not a feature your instructor needs. If there is, use the VCL method above, and download your copy of Visio to your Mac and copy it to the Windows 10 VM.


Extending Time in VCL

See the section below on Extending Time in VCL, if you are not sure how to do it.

Tip #1: Copy/paste files to and from your VM and your Computer. OR... LOSE YOUR WORK

You can copy/paste files to and from these VMs and your native computer or OS. Be sure to do so if you need to keep those files. Assuming you need to keep files for later, of course.

Tip #2: Create Reservations for 4 Hours. Extend Time if Needed.

When you create reservations, change the 1 hour time limit to 4 hours, if you think you need that long.

If you reach the end of your reservation time, and you need more time, visit https://vcl.cci.drexel.edu in your web browser, login if needed, and click and "Edit" your reservation to extend your time another hour.

You always have to manually extend reservations. They will NOT extend by themselves.

Tip #3: DELETE your Reservation When Finished to Save on CCI Resources

Zombie reservations are an unnecessary strain on our VCL system. When you are done, delete your reservation. Copy/paste your files first, but otherwise, you can always just create another VM later.

You should be able to login with your own account, or use our icommonscrc account. Reset the password using the same method we specifically mention above. Check with the CO-OP or Mike Galloway if you have any additional questions.

VCL ISSUES?

Try our troubleshooting tips BELOW!

VCL Troubleshooting Tips

If they are having issues...

  • they MUST have connected to vpn.drxel.edu using the Cisco AnyConnet VPN application.
  • tell them they MUST install and use the most current version of the Microsoft Remote Desktop app.
  • They should not use the built-in app on a Windows computer. 
  • They should get the updated app from the Windows or Microsoft Store.
  • And on a Mac, they should go to the app store on AppStore to get the Microsoft Remote Desktop app.
  • Do not double-click, or open/run the .rdp file, if they are having issues.
  • Instead, Add a PC in Microsoft Remote Desktop, enter the provided IP address, double-click the little PC window they just added in Microsoft Remote Desktop, and use the provided username and password in the pop-up window that appears when they press Connect when they have a reservation.
  • Also, while often not necessary... it can help to delete and recreate the reservation, and make a new reservation.

We cover this more detail in sections below.

  1. Install Microsoft Remote Desktop from the Microsoft Store or App Store
  2. If already installed, update your Remote Desktop Application
  3. Install Microsoft RDP
  4. Do NOT use the pre-installed Remote Desktop software on your device
  5. Once installed click '+ Add' then click on 'PCs' Remote Desktop: Click Add, Click PCs
  6. Create a reservation on VCL
  7. Click 'Connect'
  8. Do NOT click 'Get RDP file' and do NOT open the RDP file if downloaded
  9. Copy the Remote Computer IP Address and paste as the PC name on the Remote Desktop
  10. Click 'Save'
    Enter Remote Computer IP as PC Name
  11. Double-click on the Saved PC createdDouble click the Saved PC created
  12. Enter your User ID WITHOUT @drexel.edu on the Remote Desktop
  13. Enter the Password given by the Virtual Computing Lab on the Remote Desktop
  14. Click 'Connect'
    Log into RDP with your username and given password
  15. Click 'Connect anyway'
    Connect Anyway
  16. Now you are able to sign into your virtual machine
  17. Remember to delete your reservation when finished using the virtual lab machine
  1. If you receive an Error code: 0x516 Session Ended, delete your reservation and create a new reservation
  2. If a new reservation shows the same error, delete your reservation and wait up to five minutes before creating a new reservation

Error 0x516 Session Ended


  • But first make sure your remote desktop connection is enabled in Windows 11 "Settings" & "Control Panel."
    Skip the cmd.exe & Powershell sections (if any).
  • https://pureinfotech.com/enable-remote-desktop-windows-11/
  • Also, completely close & quit ANY other VPN's aside from Drexel's CiscoAnyConnect VPN.
  • Right-click & quit any other VPN app icons in the lower right system tray menu, next to the date/time.
  • And click the ^ there & right-click & quit any other VPN apps in that part of the lower right system tray, too.
  • See "Block or Allow Programs through the Windows Firewall" section at link below for help in allowing RDP through.
    Disregard it saying Windows 7 in URL below.
    Link is for Windows 10 & 11 as well, not just 7.
  • https://www.thewindowsclub.com/how-to-configure-windows-7-firewall
  • Then be sure to follow the VCL instructions in the sections above this troubleshooting section on this page.


  • You have to use the program and application.
  • Merely connecting on the https://vpn.drexel.edu webpage in a web browser will NOT work.
  • https://support.cci.drexel.edu/getting-connected/vpn/
  • More Details: If you use the Authenticator app for MFA, and approve notices on your phone, the AnyConnect app will NOT tell you that an approval notification needs to be approved on your phone first when you try to connect. But you need to tap approve on that notice first. So unlock your phone, look for notices, and even open the Authenticator app and check/refresh it for notices. If you use text messages or codes, you'll be prompted by the AnyConnect app for those.


  • If you get error screens like the screenshots below,
    and it could say /dev/sda1 or /dev/sda2 or /dev/sda3 etc:
  • Type in the command below on the command prompt on the error screen,
    but specify the correct sda# (sda1, sda2, sda3, sda4, sda5, etc).

    fsck -f /dev/sda#

    Where sda# is the sda1 or sda2 or sda3 or sda4 or sda5 or so on mentioned in the error screen as the "file system with errors."

1st of 2 Screenshots showing /dev/sda# requiring manual fsck error:

vcenter CT382-SEED Screen Shot 2022-04-25 at 4_19_24 PM


2nd of 2 Screenshots showing /dev/sda# requiring manual fsck error:

vcenter CT382-SEED Screen Shot 2022-05-04 at 10_27_12 PM