
Bb Learn Tests -- Grading the Same Test for Different Sections in an XLIST Course
Instructions
This webpage explains how to allow multiple different sections that share the same "XLIST" or cross list Bb Learn course shell to take the same test during different dates and/or times, specifically during the on-campus section dates and/or times.
Note: If your XLIST Bb Learn shell is a cross list of lecture sections, but you are giving the test during the lab sections on-campus, the instructions below won't work. Similarly, if your XLIST Bb Learn shell is a cross list of lab sections, but you are giving the test during the lecture sections on-campus, the instructions below won't work.
- Visit the Drexel Term Master Schedule and find all the lecture sections for your course.
(a) If your XLIST shell is a cross list of lab sections, then find all the lab sections.
(b) Not sure how to do either? Click the link below.
i. Visit the Drexel Term Master Schedule at the webpage below.
1. https://duapp2.drexel.edu/webtms_du/app
ii. In the "Quarter Term Courses" box, click the link for the current quarter.
iii. Click "Col of Computing & Informatics" in the left-hand navigation panel.
iv. Click the link corresponding to the subject code for the course.
1. CS = Computer Science
2. CT = Computing Technology
3. CI = Computing & Informatics
4. HSM = Homeland Security Management
5. INFO = Information Science & Systems
6. UNIV-CI = University-Wide Courses
v. Scroll through the course numbers and find your course. - Write down the 5-digit numbers (or CRNs) and the corresponding lecture section numbers (or letters) for the course.
(a) If your XLIST shell is a cross list of lab sections, then do this for lab sections instead. - In a new internet browser tab or window, enter the "XLIST" Bb Learn course shell.
- Enter "Full Grade Center."
- Do the following to create a column that will be used to list the lecture and/or lab section numbers.
(a) Click "Create Column," and enter the following on the "Create Grade Column" webpage.
(b) Enter "Lecture Section" (without quotes) for the "Column Name."
i. If your XLIST shell is a cross list of lab sections, then enter "Lab Section" instead.
(c) Scroll down, enter 0 for "Points Possible."
(d) Scroll down, and select "No" for "Include this Column in Grade Center Calculations."
(e) Scroll down, and select "No" for "Show this Column to Students."
(f) Click "Submit." - Do the following to download a tab-delimited text file containing the rows and columns in "Full Grade Center" that you can edit in Microsoft Excel.
(a) In "Full Grade Center," click "Work Offline," and click "Download."
(b) Click "Submit" on the "Download Grades" Webpage. (No need to change any settings.
(c) Click "DOWNLOAD" and save the file to your computer.
(d) In the Bb Learn course shell, scroll down and click "OK" in the lower right. - Do the following to add the lecture and/or lab section numbers or letters in a column in the tab-delimited text file in Microsoft Excel.
(a) Open the downloaded file on your computer in Microsoft Excel. (Other spreadsheet programs can be used too.)
i. Click "Yes" if a pop-up window asks if you want to open the file with a non-matching file format or extension.
(b) Sort the spreadsheet by the "Child Course ID" column.
(c) Note the "Child Course ID" column contains same the 5-digit numbers, or CRNs, that you wrote down in step 2.
(d) Enter or copy/paste the lecture section number or letter in each row of the "Lecture Section" column that corresponds the CRN, or 5-digit number" in the "Child Course ID" column.
i. If your XLIST shell is a cross list of lab sections, then enter or copy/paste the corresponding lab section number in the "Lab Section" column instead.
ii. Remove 0 or 00 from the front of any section numbers. For example, 001 should be 1, 002 should be 2, 060 should be 60, 061 should be 61, and so on.
(e) Sort the spreadsheet by the "Last Name" column.
(f) Click "File" then "Save As," choose "Tab Delimited Text (.txt)" under the "File Format" drop-down menu on Mac (or choose "Text (Tab delimited) (*.txt)" next to the "Save" button in Windows 10), then click "Save," and then click "Continue" in the pop-up window.
(g) Click "File" then "Save As," choose "Excel Workbook (.xlsx)" under the "File Format" drop-down menu on Mac (or choose "Excel Workbook (.xlsx)" next to the "Save" button in Windows 10), then click "Save," and then click "Continue" in the pop-up window.
(h) Close "Excel," and click "Don't Save" (if prompted). - Do the following to upload the modified tab-delimited text file to "Full Grade Center" in your Bb Learn course shell, which will upload the lecture or lab section number and/or letter information for each student.
(a) In the Bb Learn course shell, in "Full Grade Center," click "Work Offline," and click "Upload."
(b) On the "Upload Grades" webpage, click "Browse My Computer," find and select the text (.txt) file you saved in Excel to upload, and click "Submit."
(c) On the "Upload Grades Confirmation" webpage, make sure only the "Lecture Sections" row has a blue and white check in the "Upload" column. If so, click "Submit."
i. If your XLIST shell is a cross list of lab sections, make sure only the "Lab Sections" row has a blue and white check in the "Upload" column. And if so, click "Submit."
(d) A green bar at the top will tell you that new grades or information has been added in "Full Grade Center." - Do the following to create adaptive release rules that make sure the test submission link is only available to students during their on-campus section.
(a) Find the test link in the Bb Learn course shell.
i. It is not in "Grade Center" or "Full Grade Center."
(b) Hover your mouse pointer over the test's name or link, click the circled down arrow next to the test's name or link, and click "Adaptive Release: Advanced."
(c) Click "Create Rule." Then enter a section letter or number for the "Rule Name," and click "Submit."
i. If your XLIST shell is a cross list of lecture sections, then enter a lecture section number or letter.
ii. If your XLIST shell is a cross list of lab sections, then enter a lab section number.
(d) Click "Create Criteria" and then "Grade."
(e) On the "Grade" webpage, (1) select "Lecture Sections" (or "Lab Sections") next to "Select a Grade Center column," (2) select "Score," (3) select "Equal to" in the drop-down menu in the same row as "Score," (4) enter the section letter or number next to "Equal to," and click "Submit" (5).
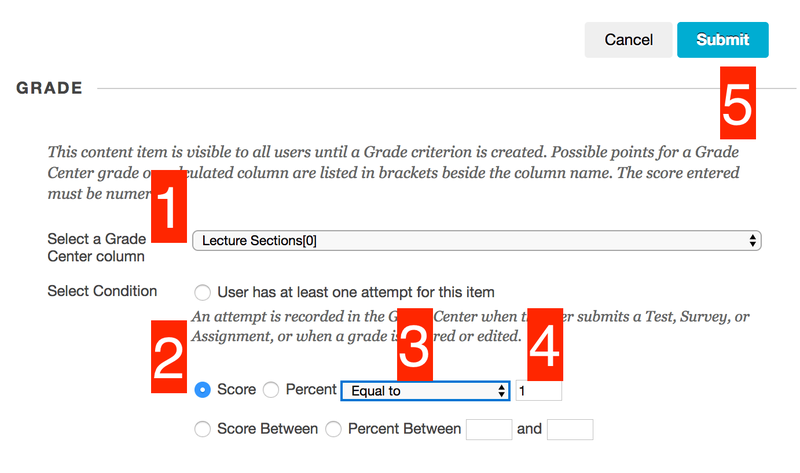
(f) Your lecture or lab section letter or number may not be "1", and so you may have a different letter or number in the box next to "Equal to" (4).
(g) Click "Create Criteria" and then "Date."
(h) On the "Date" webpage, enter the start date and time for the class for this section in the "Display After" area.
(i) Enter the end date and time for the class for this section in the "Display Until" area.
(j) Click "Submit" on the "Date" webpage.
(k) Scroll down on the "Manage Criteria" webpage, and click "OK" in the lower right.
(l) Repeat steps c-k above for each section that is taking the test.
(m) After creating a rule for each section taking the test, scroll down on the "Adaptive Release: Advanced" webpage, and click "OK" in the lower right. - Do the following to make sure that students have to take and finish the test during their own on-campus section.
(a) Hover your mouse pointer over the test's name or link, click the circled down arrow next to the test's name or link, and click "Edit the Test Options."
(b) On the "Test Options" webpage, enter the following settings exactly as described.
(c) Scroll down to "TEST AVAILABILITY, and select "Yes" next to "Make the link available."
(d) Uncheck "Multiple Attempts."
(e) Do not check "Force Completion." The timer with auto-submit will do the same thing.
(f) Check "Set Timer."
(g) In the "Minutes" box, enter the number of minutes that a single section has to take the test.
(h) Under "Auto-Submit," select "ON."
(i) Do not enter anything in the "Display After" and "Display Until" areas.
(j) Make no changes to the "TEST AVAILABILITY EXCEPTIONS" area.
(k) Set the "Due Date" and time to be at the end of the last on-campus class to take the test.
(l) Check the box next to "Do not allow students to start the Test if the due date has passed."
(m) Make any other changes you wish to the other test options on this webpage.
(n) Scroll all the way down, and click "Submit." - Note that, with these settings, no message will appear under the test name or link saying if or when the test will be unavailable or available.
- However, you should see a note
You are done.
If 1 or More Students Cannot Take the Test During Their On-Campus Section Time
If you have 1 or more students in 1 or more sections who cannot take the test during their normal on-campus section time, then do the following
- Find the test link in the Bb Learn course shell.
(a) It is not in "Grade Center" or "Full Grade Center." - Hover your mouse pointer over the test's name or link, click the circled down arrow next to the test's name or link, and click "Adaptive Release: Advanced."
- Click "Create Rule." Then enter "Alternate Test Time" for the "Rule Name," and click "Submit."
- Click "Create Criteria" and then "Date."
- On the "Date" webpage, enter the alternate start date and time in the "Display After" area for when you want the 1 or more students to start the test.
- Enter the alternate end date and time in the "Display Until" area for when you want the 1 or more students to finish the test.
- Click "Submit" on the "Date" webpage.
- Click "Create Criteria" and then "Membership."
- Click "Browse" on the "Membership" webpage.
- On the "Course Membership" webpage, check the box in front of the 1 or more students who need to take the test at an alternate time.
- On the "Course Membership" webpage, click "Submit."
- Click "Submit" on the "Membership" webpage.
- Scroll down on the "Manage Criteria" webpage, and click "OK" in the lower right.
- Repeat steps 3-13 above for each alternate test time you need to set.
- After creating a rule for each alternate test time, scroll down on the "Adaptive Release: Advanced" webpage, and click "OK" in the lower right.
- If these students cannot take the test before the "Due Date" you set for the other students:
(a) Wait for the "Due Date" that you set for the other students to pass.
(b) Hover your mouse pointer over the test's name or link, click the circled down arrow next to the test's name or link, and click "Edit the Test Options."
(c) On the "Test Options" webpage, enter the following settings exactly as described.
(d) Scroll down to "TEST AVAILABILITY, and select "Yes" next to "Make the link available."
(e) Uncheck "Multiple Attempts."
(f) Do not check "Force Completion." The timer with auto-submit will do the same thing.
(g) Check "Set Timer."
(h) In the "Minutes" box, enter the number of minutes that a single section has to take the test.
(i) Under "Auto-Submit," select "ON."
(j) Do not enter anything in the "Display After" and "Display Until" areas.
(k) Make no changes to the "TEST AVAILABILITY EXCEPTIONS" area.
(l) Set a new "Due Date" and time.
(m) Check the box next to "Do not allow students to start the Test if the due date has passed."
(n) Make any other changes you wish to the other test options on this webpage.
(o) Scroll all the way down, and click "Submit."