
Bb Learn Groups -- Let Students Make Their Own Groups
1. In your Bb Learn course shell, click the plus or + sign at the top of the left-hand course menu.
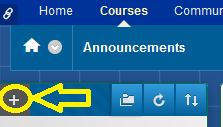
2. Click "Tool Link."
3. Enter a "Name" for this link, such as "Groups" (without quotes) or what you will.
4. From the "Type" drop-down menu, choose "Groups."
5. Check the "Available to Users" box so that this new link is visible to students.
6. Click "Submit."
Please note:
- students cannot see anything below the "Control Panel" area of the left-hand course menu in a Bb Learn course shell.
- Students can also get to their "Groups" webpage by clicking on the "Course Tools" link (if available) *ABOVE* the "Control Panel" in the left-hand course menu, then clicking "Groups."
If you did not select "Yes" to make a group or group set available when you set up the group or group set, you must at some point make this group or group set available to students before they can use it.
The page below tells you how to edit settings for groups or groups sets, and one of these settings is group or group set availability, so use the instructions at the page below to edit the group set's settings and make the group available.
Review the important notes webpage below.
Note: that you will likely need to re-enable student-created groups after we do a course copy for you.
When student-created groups are enabled, students have the ability on the "Groups" page to create a "Group" by clicking the "Create Group" button. Then they can follow the onscreen instructions to provide a name, description, and maximum number of members for the group.
Once a group is created, other students can visit the "Groups" page, click on a group name, and follow the onscreen instructions to sign-up (or add themselves) to that group.
Student-created groups have all available group tools enabled by default, but you can manually change this at any time for each student-created group. The following page will tell you how to do this.
Further instructions are provided below.
Enabling Student-Created Groups
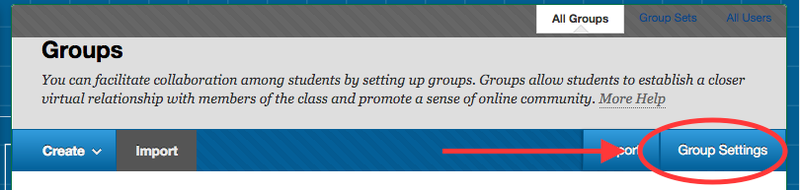
Here is how to enable students to create groups in your Bb Learn course shell.1. Click to expand "Users and Groups" in the left-hand course menu, under the "Control Panel."
2. Click "Groups."
3. Click the "Group Settings" button circled in the screenshot below.
4. On the "Group Settings" page, click the box next to "Permit Students to Create Single Self-Enrolled Groups."
5. If you want, click the box next to "Permit Students to Edit Student Created Group" on the "Group Settings" page, if you want to allow students to be able edit their group name, group description, and group's maximum number of members.
6. Click "Submit."
Disabling Student-Created Groups
Here is how to disable the ability for students to create groups in your Bb Learn course shell.1. Click to expand "Users and Groups" in the left-hand course menu, under the "Control Panel."
2. Click "Groups."
3. Click the "Group Settings" button circled in the screenshot below.
4. On the "Group Settings" page, uncheck the box next to "Permit Students to Create Single Self-Enrolled Groups."
5. Also, uncheck the box next to "Permit Students to Edit Student Created Group" on the "Group Settings" page.
6. Click "Submit."
7. Then edit each individual student-created groups' settings so that sign-up sheets for these groups are no longer available.
(a) The page below will tell you how to edit an individual group's settings.
Bb Learn Groups -- Editing Group Settings
Create a link to the "Groups" page in the left-hand navigation panel (course menu) in your Bb Learn course shell. Here's how:
1. In your Bb Learn course shell, click the plus or + sign at the top of the left-hand course menu.
2. Click "Tool Link."
3. Enter a "Name" for this link, such as "Groups" (without quotes) or what you will.
4. From the "Type" drop-down menu, choose "Groups."
5. Check the "Available to Users" box so that this new link is visible to students.
6. Click "Submit."
Please note:
- students cannot see anything below the "Control Panel" area of the left-hand course menu in a Bb Learn course shell.
- Students can also get to their "Groups" webpage by clicking on the "Course Tools" link (if available) *ABOVE* the "Control Panel" in the left-hand course menu, then clicking "Groups."