
CCI Raspberry Pi Documentation
Overview
Raspberry Pi's Drexel CCI Summer Digital Development campers are getting the Raspberry Pi 400 Keyboard.
Has a Raspberry Pi 4 inside. Not 4B. 4. CPU is Raspberry Pi (BCM2711 1.8Ghz). 4GB of RAM. WiFi and Ethernet.
You plug the cords in, connect to an HDMI monitor, they should just take you through set-up.
- Update may fail on 1st try, if not fully connect to network yet. Below is how to run update later.
- Not showing up on TV/monitor/projector? See Tips below
Beginner's Guide to Raspberry Pi Book Included with Raspberry Pi 400 Keyboards
Overview of Pi OS.
- Lots of examples of Scratch programming in Pi OS.
- Lots of examples of Python programming in Pi OS.
- Thonny IDE & Scratch apps built-in to PI OS.
- Easily lets you code & run Python & Scratch programs.
- Other programming IDE's built-in as well.
Also, Using your Raspberry Pi - Overview website below
Pi Tip #1: if Pi Doesn't Show on a TV or Monitor
- Plug in all the cords (HDMI, mouse, power) & make sure power LED on keyboard is lit.
- Connect via HDMI to a TV or monitor or projector.
- If no signal, unplug the power cord ONLY from the keyboard.
- Wait 5 seconds.
- Plug the power back in.
- That often sends a signal to the TV or monitor if nothing else worked.
Pi Tip #2: Put an HDMI coupler on the end of an HDMI cord to a TV/Monitor
- Lets you easily plug Raspberry PI HDMI to another HDMI cord without unplugging the TV/Monitor HDMI cord.
- CCI cannot give away HDMI couplers to Digital Developer Campers but we can provide one near TV's if people are playing with PI's.
Pi Tip #3: Pi screen went black
- Pi's default screen saver is just completely blank.
- Tap on a key on the keyboard.
Pi Tip #4: How to tell what type of Raspberry Pi you have
- Press CTRL+ALT+T on your Pi's attached keyboard (may need USB keyboard).
- Type in this command, then press Enter/Return.
cat /proc/cpuinfo | grep Model - More info at: https://raspberrytips.com/which-raspberry-pi-model/
Pi Tip #5: How to tell how much RAM my PI has
- Press CTRL+ALT+T on your Pi's attached keyboard (may need USB keyboard).
- Type in this command, then press Enter/Return.
free -h - More info at: https://thechrisgreen.com/2021/01/how-to-check-the-ram-on-your-raspberry-pi/
Pi Tip #6: PI Password change? Not worthy it until you are really using it.
- Don't make any new userids or passwords until you actually have some important data or info on the pi.
- If you just got your Pi, go with the defaults. Makes your life easier.
- pi is username, raspberry is password.
- Can always change the password later by going to
Raspberry Pi logo (upper left) > Preferences > Raspberry Pi Configuration > System > Change Password - Rare we ever tell anyone to not set a password, FYI.
Pi Tip #7: How to Update Raspberry Pi OS
- Press CTRL+ALT+T on your Pi's attached keyboard (may need USB keyboard).
- In Pi Terminal, type in the following:
sudo apt update
y
y
sudo reboot - Initially, all we'd recommend UNLESS you run into issues.
- For more, see: https://raspberryexpert.com/update-raspberry-pi/
- NOTES:
"sudo apt full-upgrade" will take 20 minutes.
Cleaning out logs and remnants not needed unless you do the app upgrade.
SKIP THE "Update Raspberry Pi EEPROM" SECTION". - If prompt says reboot your Pi,
but Progress in Terminal window is NOT 100%,
click OK at prompt
but do NOT reboot your PI.
Pi Tip #8: Time Adjustment
If your Raspberry Pi's time is not set correctly follow these steps:
- Type sudo raspi-config in the Raspberry Pi command line
- Internationalization options
- Change Time Zone
- Select geographical area
- Select city or region
- Reboot your pi
Pi Tip #9: WiFi
Digital Development Campers! You will need to use the drexelguest WiFi network, not dragonfly3 or anything else.
drexelguest WiFi Network Connection Tip:
- If Drexel guest email login page does not appear...
- Go to the webpage below in a web browser.
- http://neverssl.com
- Use http not https. The website is safe.
- That should redirect you to the Drexel guest email login page.
- Be sure you are on drexelguest WiFi.
- No password needed for Drexelguest network. An email is needed.
Cannot connect to dragonfly3 or is it greyed out?
Some Raspberry Pis cannot connect to WPA2 Enterprise level WiFi connections that require special log-ins.
The best case would be to attempt to manually add it. However, that's often tricky or ends in failure still.
Here is the link if you want to give it a shot:
https://iceburn.medium.com/raspberry-pi-connected-to-wifi-of-wpa2-enterprise-ddd5a40c0b07
Drexel CCI's Support page on Android WiFi may provide how to do this here.
Finally, see Drexel's WiFi manual configuraiton page
Otherwise, try using drexelguest or connecting to dragonfly3 via Ethernet, which is the best solution as Raspberry Pi's wifi cards are not always the best.
Pi Tip #10: Find IP Address for your Raspberry PI
hostname -I
or
ifconfig
If you do ifconfig, look at the 1st line UNDER "wlan0," next to "inet" for your IP address, if you are on WiFi. If on ethernet wired internet, look under "eth0," next to "inet" for your IP address.
Pi Tip #11: If you do NOT have a Raspberry Pi 400 (or Pi pre-installed inside a keyboard)
Your PI may need a wired USB keyboard and mouse, and a power charger.
Pi's 1 and 2 and Pico often do not have built-in WiFi. 1 and 2 have an Ethernet cord. Newer Pico's have Wifi.
You may not even have a case for some PI's until you buy or create one.
PROJECT You Can Try at Digital Development Camp
Everyone with a non-Pico Pi can try this.
Minecraft Pi
PROJECTS to Try at Home
IMPORTANT!
RECOMMEND HIGHLY: Getting another 16 GB or larger microSD card.
Use that separate microSD card Raspberry PI OS for 1 or more of the projects below.
You may want to get a separate microSD card for each project below.
Also, 1-2 of these projects actually use a different OS than Raspberry PI OS (like Mycroft).
Downloading & Using Raspberry Pi OS Imaging Software
DELETES all exisitng data, Pi OS, programs or apps on microSD card.
Starts with fresh Raspberry PI OS.
See "Setting Up Your Raspberry Pi" section at link below.
You can do this on Mac or Linux, as well as Windows.
SKIP the "Installing Pi-hole Over SSH" & "Setting Network Connections for Pi-hole" sections (unless installing Pi-hole)
To start download the Raspberry Pi Imager located here:
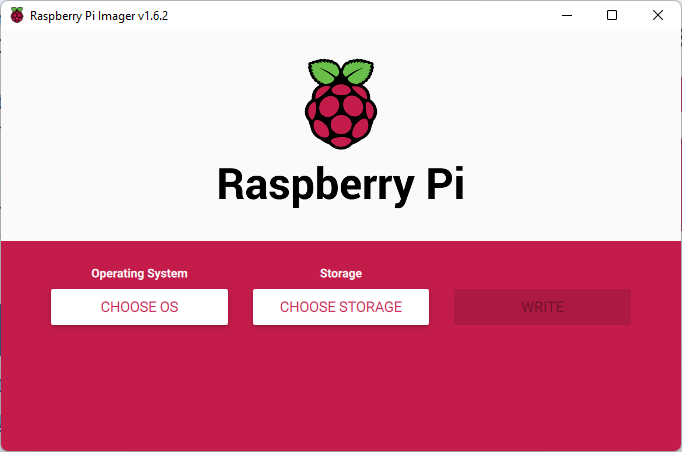
Imaging a MicroSD Card
After that, you will want to plug your MicroSD card into your computer. If you do not have a MicroSD/SD card reader on your computer we have a microSD to USB B adapter which will allow you to image the MicroSD.
You will want to then select the Operating System you would like to image on the MicroSD by clicking the white button "Choose OS".
After that select the storage device which will usually be called some sort of MicroSD or Mass Storage Device depending if you are using the adapter. Finally hit "Write" and the imaging process will begin. If for any reason the "Write" button is not clickable that means you have not properly selected an image file or storage device.
Once the MicroSD is imaged, place it into the slot on the Raspberry Pi and boot it up following the proper instructions for that image.
Imaging Using a Custom .iso File
The imaging software gives you a good amount to select from, but if you are installing a more unique image feel free to download it normally and then scroll to the option "Use custom" where it will allow you to manually select the image file on your computer
Pi-Hole: Ad Free Web Browsing
https://www.tomshardware.com/how-to/set-up-pi-hole-raspberry-pi
Mycroft: Hey Jarvis Voice Assistant
- Does NOT run on PI OS! Likely want a separate microSD card).
- https://youtu.be/4luTnRpfgbs
- Needs speakers with 3.5 line-in or aux or audio cord (with port for that cord)
- USB-only speakers may work (untested)
- Needs USB microphone
- Needs PI with keyboard, mouse, display, and internet access.
- MicroSD card (does not run on PI OS).
- Other links:
- https://mycroft-ai.gitbook.io/docs/using-mycroft-ai/get-mycroft/picroft
- https://mycroft.ai/
Wireless Display from Pi To Android or iOS
Wireless display from your Pi to an Android or iOS phone is very possible through VNC, BUT...
- The Pi and the Android or iOS device have to be on the same network.
- drexelguest network will not allow VNC to work, and we can't use any other network with Digital Development Campers on Drexel Campus. But they should have no issue doing this on their own network at home.
The links below will tell you how.
- https://linuxhint.com/use-android-phone-as-raspberry-pi-display/
Note: You do not need to use PuTTY or modify any SSH files if you have a Raspberry Pi. - https://www.instructables.com/How-to-Use-Ios-Devices-As-a-Monitor-of-Raspberry-P/
- See above tips section for how to find the IP address of your PI.
Remoting into a Raspberry Pi from Another Computer
Introduction
Remoting into the Raspberry Pi is extremely useful to use if you do not have any additional peripherals for an additional setup explicitly for the Raspberry Pi. As long as SSH is enabled on the Raspberry Pi and you know the Raspberry Pi's IP address then it is as simple as opening up a command prompt or using Microsoft's RDP program and entering the IP and credentials.
Enabling SSH on the Raspberry Pi
Below is a link to show how to ensure SSH is enabled
https://phoenixnap.com/kb/enable-ssh-raspberry-pi
Remote Desktop into the Raspberry Pi
Here is an article that properly describes how to install everything you need in order to remote desktop into your Raspberry Pi.