
Bb Collaborate Ultra
Introduction
Bb Collaborate Ultra is a virtual conferencing and lecturing tool (similar in functionality to Skype or Zoom) built into all Bb Learn course shells. It is a vast improvement over its predecessor.
By default, all students enrolled in a Bb Learn course shell can access and use a Bb Collaborate Ultra session or "room" (if a link is available to them in the shell).
Chrome or Firefox recommended. If audio/video does not work in one, try with the other.
Quick First Time Set-Up
Live Meeting Use of Bb Collaborate Ultra -- Presenters and Instructors
Video Instructions (Basics)
Written Instructions
- Enter a Bb Learn course section.
- If not already present, create a "Bb Collaborate Ultra" link in the left navigation panel.
Click the + sign at the top of the left-hand course menu.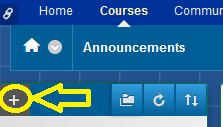
Click "Tool Link."
Enter "Bb Collaborate Ultra" for the "Name."
For "Type," choose "Blackboard Collaborate Ultra."
Check the "Available to Users" box to make the link available to students.
Click "Submit." - Click the "Bb Collaborate Ultra" link in the left navigation panel.
Click "Get launch link," if presented. - Click "Join Course Room."
- Click "Join from a browser,"
if you are on a laptop or desktop computer, and if prompted.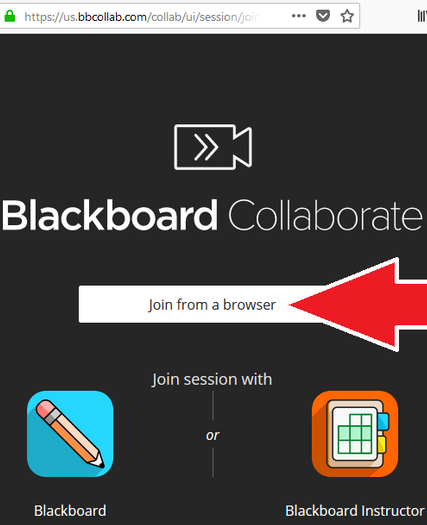
Click "Allow" or "Okay" or "Share,"
if prompted (once or multiple times).
Do this now, and for any future steps.
Video Overview of Other Items Below
Text Chat
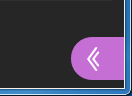
Click purple arrow in the lower right.
- Click speech bubble in lower right.
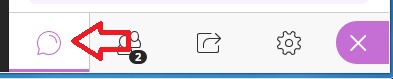
- Chat with everyone,
or choose specific people from top drop-down menu in right panel. - Type in your messages in box at bottom of right panel.
Note: You currently cannot see when someone is composing a message.
Note: Text chat is now captured during recordings.
Mute/Unmute Yourself (audio)
Click the crossed out microphone icon.
Audio issues?
- Click purple arrow in the lower right.
- Click gear icon in lower right.

- Click to expand "Audio and Video Settings."
- Click "Set up your camera and microphone."
- Follow the on-screen instructions.
- If you still can't resolve your audio issues:
Click "Use your phone for audio."
Call by phone with provided phone & PIN numbers
See Bb Collaborate Ultra -- Join by Phone
Enable/Disable Your Webcam
![]()
Click the icon above to turn on or turn off your webcam for video.
To share your computer display, or a PowerPoint presentation
To use the whiteboard, do the following:
- Click the purple arrow in the lower right (if right panel not already expanded).
- Click square with arrow icon, click "Share Application," and click "Entire Screen."

- Click "Share Blank Whiteboard."
- Use the provided tool icons to write on the whiteboard.
The following Blackboard webpage provides more information on what these tool icons do:
https://help.blackboard.com/Collaborate/Ultra/Moderator/Moderate_Sessions/Share_Content#Share_whiteboard
Note: You cannot tell who is writing on the whiteboard if more than 2 people are allowed to write on the whiteboard in a Bb Collaborate Ultra room or session.
Note: Webcam video will not appear in recordings by default when you use the whiteboard.
If you need students to see webcam video, either stop using Ultra's whiteboard, or use the work-around solution below.
If you need to screen or application share and have webcam video, open the Windows "Camera" app or Mac's QuickTime, and bring up the movie or video recording window. Don't start recording. Just bring up up the window showing the webcam video to the foreground on your computer display when you want students to see what you are writing while screen sharing in Ultra. Expand the window if necessary.
For help with doing this on a Mac, see the following webpage.
QuickTime -- Basics
To share a file, do the following:
- Click the purple arrow in the lower right (if right panel not already expanded).
- Click square with arrow icon, click "Share Application," and click "Entire Screen."
- Click "Share Files."
- Follow the onscreen instructions to share files.
(Moderators Only) Make someone a presenter:
- Click purple arrow in the lower right.
- Click people icon or Attendees icon
- Hover your mouse pointer over a Participant you want to make a Presenter.
- Click the ... icon next to that person's name.
- Click "Make presenter." You may want to send presenters a link to this very webpage so that they know how to use Bb Collaborate Ultra as a presenter.
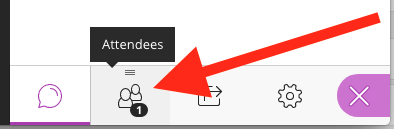
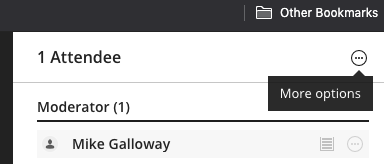
To Mute All
- Click purple arrow in the lower right.
- Click people or Attendees icon
- Click the ... icon next in upper right.
Then click "Mute All."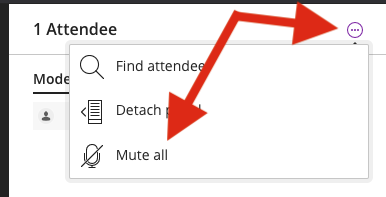
Note: Muted attendees see a notification telling them that the moderator has muted their microphone.
Attendees can turn their microphone back on after being muted.
Link in Left Nav Panel or Content Area
Session Best Practices
- DU IT, Drexel ITG, and Blackboard all recommend the following best practices
- https://help.blackboard.com/Collaborate/Ultra/Moderator/Moderate_Sessions/Session_Best_Practices
How Students Can Access
Pre-Record Lectures in Bb Collaborate Ultra
Accessing or Downloading Recordings
Group Work or Breakout Rooms
Making Students into Presenters for Group Presentations
Advanced Notes
Optional - Lock Course Room
Some instructors do not use the 24/7 course room, and instead use scheduled sessions.
If you are one of these instructors, we recommend locking the course room to avoid confusion.
Here's how to lock the course room in your Bb Learn course shell.
- On the Bb Collaborate Ultra page, click the circled ellipsis or three periods icon in the upper right.
- Click "Lock course room."
- That's it!
It's the same procedure for unlocking,
but click "Unlock course room" instead for step 2.
Here's an example image.

More Optional Advanced Notes
For advanced use of, and additional notes on, BB Collaborate Ultra: