
Turnitin -- Finding and Deleting Old Turnitin Assignments
**OUT OF DATE**
Introduction
Below you will find instructions on how to find and delete old Turnitin assignments (not Turnitin Direct) and how to check "Full Grade Center" to make sure the grade calculations are correct afterward. Please note that old Turnitin was shut off in Bb Learn on March 24, 2016.
*IT IS RECOMMENDED TO FIRST CREATE REPLACEMENT TURNITIN DIRECT ASSIGNMENTS BEFORE DELETING OLD TURNITIN ASSIGNMENTS.*
Please see the following page on creating Turnitin Direct assignments.
Find Old Turnitin Assignments
Now that old Turnitin has been shut off in Bb Learn, it is more difficult to locate old Turnitin assignments.
One way to locate old Turnitin assignments is by looking at the "Column Organization" page in "Full Grade Center" in your Bb Learn course shell or shell and looking for columns whose category is "Turnitin Assignment" and then looking through your course for leftover old Turnitin assignment submission links. Here's how to do that.
- If the names of the old Turnitin assignments were provided to you already, skip to step 7. Otherwise, in your Bb Learn course shell or shell, click to expand "Grade Center" under the "Control Panel" in the left-hand course menu.
- Click "Full Grade Center."
- Click "Manage."
- Click "Column Organization."
- Scan through the entire page (be sure to scroll to the bottom) and look for rows where "Turnitin Assignment" is listed in the "Category" column. Write down the name from the "Name" column of any row that fits this criteria. This will be your list of old Turnitin assignments.
- Scroll up or down and click "Cancel."
- For each name in the list of old Turnitin assignments, perform the following in "Full Grade Center":
(a) Click the circled down arrow in the column header with the same name.
(b) Click "Edit Column Information."
(c) Next to the name you in the list of old Turnitin assignments, write down the "Item Name" Or "Grade Center Name" if either is different than what you wrote down in step 5.
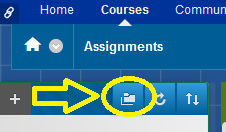
(d) Click "Cancel." - At the top of the left-hand course menu, click the double-folder icon circled in the screenshot below.
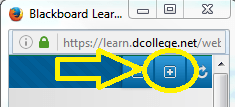
- At the top of the pop-up window that appears, click the + sign circled in the screenshot below.
- Scroll down and scan the expanded folder view of the course in the pop-up window and try to find the locations in the course shell or shell of the names of the old Turnitin assignments. Write these locations down.
(a) Drag the lower right corner of the pop-up window to enlarge it if necessary.
(b) You may wish to simultaneously press Ctrl and f on a PC or Cmd and f on a Mac to activate the find text in page function, type in a name, and search for the name that way.
(c) Note that if you click a link in the expanded folder view in the pop-up window, you will be taken to that page or the page with that item in the primary Bb Learn window.
If you know you have old Turnitin assignments in your course but cannot find them using the above instructions, let us know.
Deleting Old Turnitin Assignments
DO NOT MAKE CHANGES IN ANY QUARTERLY COURSE SHELL THAT YOU TAUGHT STUDENTS WITH IN PREVIOUS QUARTERS.
To delete old Turnitin assignments, do the following:
- Find an old Turnitin assignment submission link in your course. It will be in an area of your course in Bb Learn where you see the following four drop-down menus appear. (The left-hand course menu will likely have different headings and links in it than the screenshot below, and you will likely not see "Course Materials" at the top of the page as in the screenshot below):

Also, the old Turnitin assignment submission link will look similar to the screenshot below, but it will have a different name than "TII__Assignment_2".
- Hover your mouse over the old Turnitin assignment submission link, and click the circled down arrow that appears next to it.
- Click "Delete."
- Click "OK."
- Enter "Full Grade Center."
- Check to make sure that there is no corresponding column appearing for the old Turnitin assignment you deleted. If there is, click the circled down arrow in the Turnitin assignment column header, click "Delete Column" and click "OK."
(a) If you still cannot delete the column (this is likely), click the circled down arrow in the column, click "Quick Column Information," and copy down the column's "Name" and "Column ID." - Repeat these steps for each old Turnitin assignment.
(a) If there were any columns you couldn't delete (probably most), send us their names and column IDs so that we may assist you further with deleting the columns.
Check "Full Grade Center"
Once you are finished deleting old Turnitin assignments and creating new Turnitin Direct assignments to replace them, check "Full Grade Center" again by doing the following:
- Check to see if you have a weighted total, total, average, or min/max column. If you do, proceed with the following steps for each of those columns:
- Click the circled down arrow in that column.
- Click "Edit Column Information."
- Click "OK" in each pop-up window if you have pop-up windows appear.
- Scroll down to "SELECT COLUMNS."
- If you include specific columns or categories, and one or more of the specific columns or categories included in the "Selected Columns" area were the old Turnitin assignments, add the new Turnitin Direct assignments to the "Selected Columns" area to make sure the "Selected Columns" area adds up to 100%.
(a) If you include categories in the "Selected Columns" area, then you'll need to make sure the new Turnitin Direct assignments are included in the proper categories that are included in the "Selected Columns" area and then repeat these steps. A good way of checking and changing categories for multiple columns in "Full Grade Center" is the following:
i. Click "Full Grade Center" in the left-hand navigation.
ii. Click "Manage."
iii. Click "Column Organization."
iv. Check the third column or "Category" for which category each grade column is in.
v. If category changes are necessary, check the box in front of one or more grade columns, click "Change Category to" at the bottom or top of the screen, click "Submit."
vi. Return to step 1 above and repeat the steps. - Click "Submit."