
Adding an Announcement Tool Link to the Left-Hand Course Menu
Creating a Content Area Course Menu Link
If you want to add a content area course menu link, or if you are not sure what a content area is, see the following webpage:
Creating a Tool or Web or Course Link or a Subheader or Divider
Here is how to create a new link or text header or divider line in the left-hand course menu above the "Control Panel" in a Bb Learn course shell.
Click the + sign at the top of the left-hand course menu but beneath the "Home" link and house icon.

Click on the type of course menu link that you want to add.
- Tool Link: For discussion boards (not group ones) or announcements or Bb Collaborate Ultra or Course Analytics (Student Report) or Calendar or more.
- If you are not sure what a particular tool does and wish to know, contact us.
- Blank Page: An entire page you can edit to which you can add text, images, files, and more.
- Web Link: A link to an external website outside of Bb Learn.
- Do not use to link to Bb Learn shell webpages.
- Course Link: A link to another part of the course shell
- Subheader: Non-clickable text.
- Divider: A horizontal line for to separating sections in the left-hand course menu.
- Content Area: See the above section.
- Module Page: A page containing modules you selected to add.
- Bb Learn Groups -- Group Sets or Creating Multiple Groups
- The link above takes you straight to a section on modules.
- Bb Learn Groups -- Group Sets or Creating Multiple Groups
- Tool Link: For discussion boards (not group ones) or announcements or Bb Collaborate Ultra or Course Analytics (Student Report) or Calendar or more.
- Enter a "Name."
- For Bb Collaborate Ultra, name this link "Bb Collaborate Ultra" (or what you will).
- For "Calendar," name this link "Calendar" (or what you will).
- For a "Tool Link," choose a "Type" drop-down menu option.
- For announcements, choose "Announcements."
- For Bb Collaborate Ultra, choose "Blackboard Collaborate Ultra."
- For "Calendar," choose "Calendar."
- For "Course Analytics (Student Report)," choose "Course Analytics (Student Report)."
- For discussion board, choose "Discussion Board."
- Not for group discussion boards.
- For "My Grades (where students can easily see their grades and your feedback), choose "My Grades."
- For a "Tools" page for students, choose "Tools Area"
- Check the "Available to Users" box to make the link available to students.
- Click "Submit."
Editing or Deleting Subheadings, Dividers, or Other Links in the Course Menu
- Hover your mouse cursor over the heading, divider, or link to edit.
- You can only edit links above the "Control Panel" In the left-hand course menu.
- Click the circled down arrow next to the heading, divider, or link.
- Choose "Rename Link," "Hide Link," "Show Link," or "Delete."
- Hiding or showing a content area? See the following webpage:
Deleting a content area?
Content, assignments, and tests in that content area, along with corresponding Grade Center columns, will be deleted permanently, with some exceptions:
- Test and survey master templates in the course shell remain.
- Discussion board forums/threads/posts and grades remain.
- Blogs, wikis, and journal posts, comments, and grades remain.
- Groups remain, but not group assignment submission links in content areas and corresponding Grade Center columns.
- Course reserve items remain.
- Kaltura audio/video remain in other parts of Bb Learn, but if you are not an owner, co-editor, or co-publisher of the video, you may have difficulty recovering it.
- Embedded media or files usually remain in the shell's content collection but will be inaccessible to students.
- If you absolutely need to delete these files or use them again, see the Additional Assistance section below to contact us.
- If you use VoiceThread, before deleting the content area, see the Additional Assistance section below to contact us.
- Bb Collaborate Ultra rooms/sessions/recordings.
- Hiding or showing a content area? See the following webpage:
- Follow the onscreen instructions.
- Click "Submit."
Reorder Links in the Left Navigation Panel or Course Menu
Here is how to reorder links *ABOVE* the "Control Panel" in the left navigation panel (course menu) in a Bb Learn course shell. Links under the "Control Panel" in the left navigation panel (course menu) in a Bb Learn course shell are not visible to students and cannot be reordered.
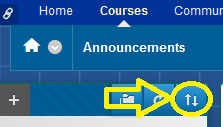
Click the up-down arrow icon at the top of the left navigation panel (course menu).
- In the "Reorder: Menu Items" pop-up window, select the link to move up or down.
- Scroll up or down if necessary to find the link.
- Click the or to move the selected course menu link up or down in the "Items" area in the "Reorder: Menu Items" pop-up window.
- When the left navigation panel link is in the desired location, click "Submit."
- Click "OK" at the prompt telling you the navigation panel links have been reordered.