
Bb Learn Groups -- Add and Remove Students and Non-Students
Introduction
Here is how to add users of a Bb Learn course shell or shell to existing groups in Bb Learn. This covers adding students *AND* non-students alike, but note that TAs and Instructors already have access to group areas without being added to groups.
Warning with Group Assignments and Changing Group Memberships
If your students have started or submitted any group assignments, do not change the membership in these groups. Or you may lose assignment submissions.
There is a way around this, however.
First, check "Full Grade Center" for one of the following icons to see if any of your students have saved a draft to or submitted to a graded group Bb Learn assignment column.
- an "Attempt in Progress" clock icon or

- a "Needs Grading" exclamation point icon or

- a "Completed" checkmark icon or

- a number grade or letter grade
If none of your students have submitted or started a group assignment, then make whatever group membership changes that you wish. There is no issue here.
Otherwise, the instructions below provide our recommended way for changing group memberships when your students have started or submitted a graded group assignment.
- Write down the names of groups and group memberships whose names need changing.
a. These groups will be "ARCHIVED." - In the Bb Learn course shell, click to expand "Users and Groups" in the left-hand course menu under the "Control Panel."
- Click "Groups."
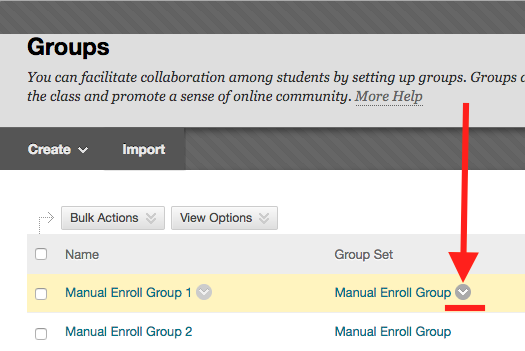
Hover your mouse pointer over a group's name in the "Name" column where you want to add users, and click the circled down arrow next to that name.
- Click "Edit Group."
- Add the word "ARCHIVED" to the start of the group's name.
- Make the group unavailable to students.
a. Select "No" next to "Group is visible to students." - Do not add or remove group members from this "ARCHIVE" group.
- Click "Submit" on the "Edit Group" page.
- Repeat steps 4-9 above for each group that needs to be "ARCHIVED."
- Create new groups with new group members to use in place of any "ARCHIVE" groups.
a. Not using group sets? See the following webpage for how to create new groups.
i. Add "NEW" to the start of any new group's name.
ii. Bb Learn Groups -- Creating a Group
iii. Perform step 12 below after following the instructions on the webpage above.
b. Using group sets? Do the following:
i. Click to expand "Users and Groups" in the left-hand course menu under the "Control Panel."
ii. Click "Groups."
iii. Hover over the name of a group set under the "Group Set" column.
iv. Click "Edit Group Set Membership."

v. Un-check the box next to "Hide members already in another group in this set."
vi. Do NOT add or remove group members from any existing groups.
vii. Do NOT delete any existing groups.
viii. Click the "Add Group" button to add a group.
ix. Add "NEW" to the front of this new group.
x. To add group members, do the following:
1. Click "Add Users."
2. In the "Search:" row at the top of the "Add Users" pop-up window that opened up:
a. select "Any" in the first drop-down menu,
b. select "Not Blank" in the second drop-down menu,
c. and leave the text field empty.
3. If you want to add a non-student to the group, check the "Show all users regardless of role" box.
4. Click "Go."
5. Find the user you want to add to the group, and check the box next to their "Username."
a. If you can't find the user you want to add, scroll down to the bottom, click "Show All" and search again.
6. Click "Submit" in the "Add Users" window.
xi. Click "Submit" on the "Edit Group Set Memberships" webpage.
1. This saves your group membership changes for this group set.
xii. Perform step 12 below after following the above instructions. - Remove all "ARCHIVE" groups AND add "NEW" groups from all upcoming group assignments.
a. The following webpage says how to change groups assigned to group assignments.
i. Bb Learn Assignments -- Troubleshooting -- Assigning Groups
Single Group
Here is one method for adding or removing group members.
If you don't have any graded group assignment or activity in your Bb Learn course shell, make whatever group membership modifications you wish.
Otherwise, be sure to read the warning above before proceeding with any group membership changes.
- In the Bb Learn course shell, click to expand "Users and Groups" in the left-hand course menu under the "Control Panel."
- Click "Groups."
Hover your mouse pointer over a group's name in the "Name" column where you want to add users, and click the circled down arrow next to that name.
- Click "Edit Group."
- Scroll down to "MEMBERSHIP."
To add group members, do the following:
a. Click "Add Users."
b. In the "Search:" row at the top of the "Add Users" pop-up window that opened up:
i. select "Any" in the first drop-down menu,
ii. select "Not Blank" in the second drop-down menu,
iii. and leave the text field empty.
c. If you want to add a non-student to the group, check the "Show all users regardless of role" box.
d. Click "Go."
e. Find the user you want to add to the group and check the box next to their "Username."
i. If you can't find the user you want to add, scroll down to the bottom, click "Show All" and search again.
f. Click "Submit" in the "Add Users" window.To remove a group member, click the "x" in the row of a member.
Repeat to remove multiple group members.Click "Submit" on the "Edit Group" page.
Repeat steps 3-8 for each group whose memberships you want to change.
Group Set Method
Here is a second method for adding or removing group members.
If you don't have any graded group assignment or activity in your Bb Learn course shell, make whatever group membership modifications you wish.
Otherwise, be sure to read the warning above before proceeding with any group membership changes.
- Click to expand "Users and Groups" in the left-hand course menu under the "Control Panel."
- Click "Groups."
Hover over the name of a group set under the "Group Set" column.
Click "Edit Group Set Membership."
- Choose whether the "Group is visible to students."
- Under "GROUP SET ENROLLMENTS," make sure a check appears next to "Hide members already in another group in this set."
- Don't care who is in what group?
a. Click the "Randomize Enrollments" button, and click "Submit" in the pop-up window that appears.
b. This automatically assigns students to groups in this group set.
c. Any existing group memberships for this group set are overwritten.
d. Don't add non-students to groups using this method.
a. Clicking the "Add Users" button, and do the following in the "Add Users" pop-up window.
i. Check the box next to one or more students you want to add.
ii. Scroll down, and click the "Show All" button to make sure you see the full student list.
iii. To search for all students in the class, do the following:
- Set the "Search" row options to "Any" (1st drop-down menu) and "Not Blank" (2nd drop-down menu).
- Remove all text in the text box before the "Go" button.
- Un-check the box for "Show all users regardless of role."
- Click "Go."
v. Generally, there should be no check next to "Show all users regardless of role."
vi. Click "Submit."
b. Remove specific group members in a group by clicking the "X" in their row.
c. Click "Remove All Users" button for a group to remove all members of that group.
d. Click the "Delete Group" button for a group to completely remove that group.
e. Click the "Add Group" button to add a group.
f. Click "Submit" on the "Edit Group Set Memberships" webpage.
This saves your group membership changes for this group set.
All Groups Method
A group set is a group of groups. You can change add or edit the members in all the groups in a group set simultaneously using the method below.
If you haven't assigned students to any groups yet, or if you don't have any graded group assignment or activity in your Bb Learn course shell, please feel free to make whatever group membership modifications you wish.
Otherwise, be sure to read the warning above before proceeding with any group membership changes.
- In the Bb Learn course shell, click to expand "Users and Groups" in the left-hand course menu under the "Control Panel."
- Click "Groups."
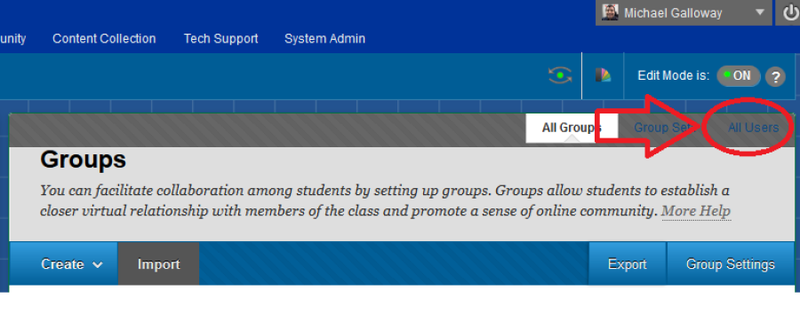
- Click the hard-to-see "All Users" link under "Edit Mode is" in the upper-right hand corner of the "Groups" page.
- In the "Search:" row at the top of the "All Users" page, select "Any" in the first drop-down menu, select "Not Blank" in the second drop-down menu, and leave the text field empty.
- If you want to add a non-student to the group, check the "Show all users regardless of role" box.
- Click "Go."
- Find the user you want to add to a group.
a. If you can't find the user you want to add, scroll down to the bottom and click "Show All" and search again, or try navigating to another page of users using the controls at the bottom of the page. - Hover with your mouse pointer over the "Groups" area in the row for the user you want to add to a group.
- Click "Add to Group."
- Select a group from the drop-down menu and click "Submit" in the "Select a Group" pop-up window.
- The user will disappear from view when the page reloads.
a. If you wish to verify that the user is part of the correct group, repeat steps 4-7 and see if the correct group's name appears in the user's "Groups" area.
b. If you wish add a non-student user to another group, repeat steps 4-11.
c. If you wish to add a student to multiple groups, see the Additional Assistance section below and contact us.
Editing Other Group Settings
See the webpage below for how to edit other group and group set settings.
Method Not Recommended
The following method of editing or adding group members is not recommended, as this method results in an error and seems to some to result in a navigation loop.
- In a Bb Learn shell with groups, click to expand "Users and Groups" in the left-hand course menu. Click "Groups." Click on a group name. Click the circled down arrow next to the group name at the top of page (see attached screenshot). Click "Edit." If you click "Cancel" or "Submit," you will get an error message. (Any changes submitted will have been saved, though.) If you click "OK" in the lower-right, you are taken back again to the "Edit Group" webpage again. (You need to click some other link or navigation icon to navigate away from the "Edit Group" webpage, or else you'll keep coming back to it.)